

NM01UDS273
Tags:
Ultrasonic Rail Flaw Detector UDS273 Standard Double Version (double rail)
$36,250.00
Choose Quantity
Product Details
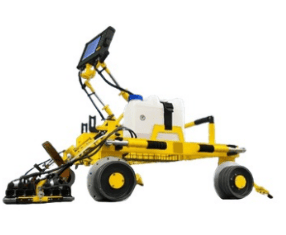
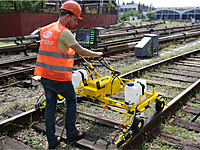
The flaw detector is intended for defect detection on the running surface of both rails and in the rail cross-section, excluding rail base blades. It employs a flaw detection trolley for continuous testing and manual probes for confirmatory testing of individual rail cross-section segments and welded joints.
Flaw detector advantages
- complete scanning of the rail (excluding rail base blades) due to the flaw detector multi-channeling;
- built-in standard settings for channel operation;
- determining the distance and speed during continuous testing;
- real-time test result display in B-Scan mode (for 4 channels);
- scanning and saving the information every other millimeter of traveled distance from all channels;
- test results recorded at different sensitivity levels;
- registration of all test results and advanced capabilities of data analysis;
- the flaw detector with the standard scanning scheme applied enables detecting all types of fatal defects, appearing during the operation of a rail track.
Flaw detector distinctive features
- large color high-contrast TFT display;
- encoder synchronization;
- information display forms: А-Scan, B-Scan;
- number of channels for continuous testing: 28;
Technical Details:
| Overall dimensions of flaw detector without a handle and with one ultrasonic unit and power unit | no more than (1040×1640×1130) mm; in transport position – no more than (900×2060×600) mm. |
| Equipped flaw detector weight | no more than 50 kg. |
| Keypad | English, Russian. |
| Languages | English, Russian. |
| Number of ultrasonic units | 4 |
| Number of ultrasonic channels | 28 channels. |
| Connector types | BNC, RS-19. |
| Data storage | Flash card. |
| Independent power source | NiMH storage battery of rated voltage 12 V and rated capacity 17 А∙h. |
| Operation time | 10 hours. |
| Flaw detector consumed electric power | no more than 30 V•А. |
| Time of flaw detector operation mode setup | no more than 15 sec. |
| Display resolution | 800×480 pixels. |
| Screen dimensions (width, height, diagonal) | 155 mm, 95 mm, 180 mm (7.5 inches). |
| Warranty | 1 year. |
| Interfaces | |
| USB | USB-A (host), USB-B (slave). |
| Trigger O | available. |
| Headphones | available. |
| Encoder output | Single-coordinate encoder. |
| Main metrological performances | |
| The limits of admissible main absolute error of flaw detector during the measurement of depth dН and coordinates |
|
| The limits of admissible main absolute error during the measurement of signals amplitudes ratio ∆N at the reception path input in the gain range from 20 dB to 80 dB | ∆N = ±(0.2+0.03N); ∆N ─ main absolute error during signals amplitudes ratio measurement, dB; |
| Time instability of flaw detector reception path sensitivity | ± 0.5 dB for 8 hours of continuous operation. |
| Protection level in operation | IP 64 |
| Ambient temperature | from minus 400 to plus 500С. |
| Atmospheric pressure | from 84 to 106,7 kPa. |
Relative humidity | (93 ± 3) at a temperature 25 ºС. |
| Flaw detector in shipping package is resistant to the influence of |
|
| Flaw detector retains its parameters when it is influenced by electromagnetic interferences which do not exceed the following norms |
|
| Full average flaw detector lifetime | no less than 10 years. |
| Probability of no-failure operation | no less than 0.9 for 2 000 h. |
| Pulser | |
| Initial pulse type | Short pulse of negative polarity. |
| Initial pulse frequency | One-channel mode – 250 Hz; complete mode – no more than 1000 Hz. |
| Amplitude | 180 V |
| Duration | 60±10 ns |
| Rising edge duration | no more than 20 ns. |
| Synchronization type | from an initial pulse, from an encoder. |
| Receiver | |
| Gain | from 0 to 100 dB with a step of 0.1, 1, 10 dB. |
| Input signal | no more than 2 V from a peak to a peak. |
| Input reception path resistance | no more than 300 Ω. |
| Digital filter | 1 standard digital filter with central frequency 2.5 MHz. |
| Rectifier | envelope. |
| Setups mode | |
| Measurements | mm |
| Testing range | from 0 to 1000 mm, with a step 1, 10, 100 mm. |
| Velocity | from 2000 m/s to 8000 m/s, with a step 1, 10, 100, 1000 m/s. |
| Probe zero | from 0 to 60 µs, with a step 0.1, 1 µs. |
| Range delay | from 0 to 1000 µs, with a step 1, 10, 100 µs. |
| Probe angle | from 0 to 900, with a step 10, 100 |
| Cycles/gates | |
| Number of cycles | max. number of cycles 16. |
| Cycle duration | 0.01 - 0.4 ms. |
| Number of gates in a cycle | max. number of gates 2 for each channel. |
| Gate fixation level | from 0 % to 100 % of vertical screen scale. |
| ALARM | When the signal goes beyond the ALARM level, when the signal stays within the ALARM level. |
| ALARM system | |
| Sound ALARM system | sound – separate for each rail and combined (for a group of channels); range of pulse frequency setup of alarm system sound indicator is from 0.5 to 5 kHz, with a step 100 Hz. |
| Light ALARM | light – separate for each rail and combined (via all ensounding channels); visual by the screen – separate for each rail and each channel. |
| Measurements in A-scan mode | |
| Displayed parameters | 4 measuring parameters are displayed in a status bar. |
| |
TCG curve | max. number of points is 14 per cycle, dynamic range 100 dB, vertical setup step 1 dB, horizontal – 2 mm. |
| Measurements in B-scan mode | |
| "Raw" B-scan |
|
