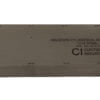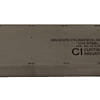


NM01PACSNAVM
Choose Quantity
The Curtis Industries NAVSHIPS Cylindrical Reflector Block is a specialized ultrasonic calibration standard designed for specific applications in Non-Destructive Testing (NDT). This block is distinct from the more common NAVSHIPS blocks (like the 0900-006-3010/Section 6, also known as the Mare Island block, which features side-drilled holes for DAC and sensitivity). While the standard NAVSHIPS block focuses on DAC and flaw depth with side-drilled holes, a "Cylindrical Reflector Block" is often used to evaluate transducer resolution, beam characteristics, and depth sizing, particularly for flaws that might resemble cylindrical shapes, or for calibrating shear wave probes.
This particular block is made from 1018 Steel, a common material for ultrasonic calibration standards due to its consistent acoustic properties. The block features a 125 Ra (Roughness average) surface finish on all scan surfaces. A 125 Ra finish is rougher than the 32 Ra finish found on many precision DAC blocks. This coarser finish is sometimes specified to simulate the surface conditions of actual components that might be inspected in the field, particularly in applications where surface preparation is not pristine, or for specific transducer types (e.g., dual-element probes) that perform better on slightly rougher surfaces.
The block's dimensions are 12.000" x 3.000" x 1.250" (304.8mm x 76.2mm x 31.75mm). While the user specified "Cylindrical Reflector Block," this particular block's dimensions match the standard NAVSHIPS block. Information from Curtis Industries suggests that their "NAVSHIPS Cylindrical Reflector Block" (often under the same 0900-006-3010/Section 6 umbrella, but likely a specific configuration or variant with internal features) is intended for distance amplitude correction, sensitivity levels, and flaw depth information, containing six 3/64" side-drilled holes at various depths. It's possible the "Cylindrical Reflector" refers to the type of internal flaw feature (like side-drilled holes acting as cylindrical reflectors) rather than an external cylindrical shape of the block itself.
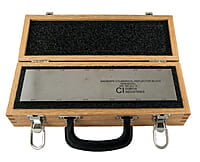
Each Curtis NAVSHIPS block comes with a Certificate of Conformance or Calibration, ensuring its adherence to specified dimensions and internal flaw characteristics, traceable to national standards. It is supplied in a durable wood case for protection, storage, and transport, safeguarding its integrity and accuracy.
Key Features & Benefits:
Standard Compliance: Often conforms to NAVSHIPS Specification 0900-006-3010/Section 6, or a variant thereof, which covers various configurations of NAVSHIPS blocks.
Precise Dimensions:12.000" x 3.000" x 1.250" (304.8mm x 76.2mm x 31.75mm), providing a consistent reference.
Material: Constructed from 1018 Steel, known for its consistent acoustic properties for reliable ultrasonic calibration.
Surface Finish:125 Ra (Roughness average) on all scanning surfaces. This finish simulates less-than-perfect field conditions or is suitable for specific transducer types, influencing transducer coupling.
Internal Reflectors (Likely): Based on the dimension matching other NAVSHIPS blocks of this size, it likely contains six 3/64" (1.19mm) diameter side-drilled through-holes at depths consistent with the DAC blocks (e.g., 0.250" to 2.750" in 0.250" increments). These side-drilled holes act as cylindrical reflectors for ultrasonic waves.
Calibration Purpose: Used for:
Distance Amplitude Correction (DAC): Establishing curves to compensate for signal amplitude variations with depth.
Sensitivity Setting: Adjusting the instrument's sensitivity to detect flaws of a given size.
Flaw Depth Sizing: Providing known depth references for accurately locating and sizing actual flaws.
Beam Characterization: Potentially used to evaluate the shape and characteristics of the ultrasonic beam.
Documentation: Includes a Certificate of Conformance/Calibration, traceable to national standards.
Protective Wood Case: Supplied with a custom-fitted wood case to protect the block from damage, corrosion, and contamination, preserving its accuracy and longevity.
Applications:
Ultrasonic Flaw Detection: Calibration and performance verification of ultrasonic flaw detection equipment.
Naval & Maritime Inspection: Essential for NDT procedures in naval shipbuilding and maritime maintenance, particularly where specific NAVSHIPS standards apply.
Industrial NDT: Used in various industries requiring ultrasonic inspection, especially where a coarser surface finish is preferred for calibration that matches field conditions.
Training & Education: A valuable reference block for NDT training programs.
Procedure Qualification: Development and qualification of ultrasonic inspection procedures, especially for steel components.
