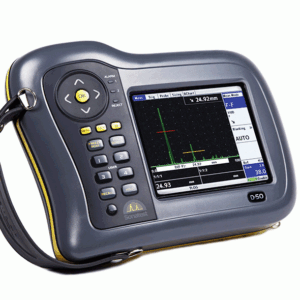
Adelix ADL-UT35 Ultrasonic thickness gauge

Ultrasonic thickness gauge ADL UT 35 is designed to measure the thickness of products and structures made of metal alloys and isotropic non-metallic materials with one-sided access to them.

Have questions about buying this product?

Chat with a Nomo Specialist

Ultrasonic thickness gauge ADL UT 35 is designed to measure the thickness of products and structures made of metal alloys and isotropic non-metallic materials with one-sided access to them.

Thickness gauge ADL UT 35 is often used to quickly measure the thickness of products made of various materials subject to corrosion, erosion, internal deposits, including those with a coarse-grained structure, metal and non-metal products: sheets, containers, pipes, pipelines, bridges, hulls , transport and other structures, during their operation to determine the corrosion state or after their manufacture.

The advantages of the thickness gauge are signal representation in the form of an A-scan, thickness control through the coating, construction of a thickness profile of the inspected surface (B-scan), measurement of ultra-small thicknesses, wide functional amplification of the useful signal, simple device setup, bright and colorful display, various measurement modes thickness, a wide library of sensors, the ability to work with any transducers.

It doesn’t matter if it’s flat or curved, you’ll get the exact thickness. With the UT 35 thickness gauge, you can use any ultrasonic transducers with frequencies from 0.5 to 15 MHz, both combined (including with delay lines) and separate-combined (separate) types.

The thickness gauge implements various possibilities of thickness control – high-precision measurement of the time for the transition through the “zero”, measurement of the time between “echo-echo” signals, measurement of the thickness of the metal under coatings, etc.

The presence of a real signal on the screen makes it possible to eliminate typical errors in thickness measurement using ultrasonic testing and improve measurement accuracy.

This product does not have additional information.
  • Range of measurements from 0,4 to 600 mm;
  • Auto-detection of connected transducers with built-in memory;
  • Connection of high-temperature converters up to 350 °С;
  • Measurement methods:
    Pulse – Echo – the classic measurement method
    Echo-Echo-Echo – measurement of metal thickness through the coating;
  • Graphical display and saving of A and B scans;
  • Connection of a wide range of transducers (both combined and separately-combined);
  • Ability to set thickness tolerances (upper and lower values)
  • High speed of measurements and processing due to a powerful microcontroller and additional RAM;
  • Ability to calibrate both the speed of ultrasound in the material and the thickness of the material.
  • Reliable anti-shock dust and moisture-proof housing;
  • Saving a large number of measurement results, including A and B scans;
  • Specialized software;
  • The color high-contrast display with adjustable brightness;
  • Data transfer to PC via standard USB-C connectors;
  • Possibility of measuring thickness through the coating without cleaning the surface
  • The presence of a B-scan, which allows you to build an accurate and visually clear profile of the bottom of the product with fixation of the signal minimum for the entire scanning time. This feature allows you to quickly scan large areas.
  • The presence of a signal in the form of an A-scan, which eliminates the measurement error, because the operator, by the mark on the scan, understands in which zone the measurement was captured, in contrast to the traditional digital one (a typical error is doubling the thickness), as a result, the accuracy of the measurement increases.
  • In the setup mode, the whole range of possibilities is available for adjusting the gain of the receiving path, AGC, TCG, generator and receiver parameters, prism delay calibration and speed in the material, and so on.
  • High-precision zero-crossing measurement, two independent gates and the latest low-noise receiver allow precision measurements of ultra-thin thicknesses with combined transducers in the “echo-echo-echo” mode, including under various coatings.
  • The “DIGIT” mode allows you to remove unnecessary information from the screen for typical traditional applications, turning a good technical device into an easy-to-use control tool.
  • In the “TABLE” mode, the user can create a tabular matrix for the control of large-sized standard products by marking control points. This set of results can be transferred to a PC for subsequent statistical analysis.
  • Thanks to the sensor library, setting up the instrument is quick and easy.
    High reliability and security, which is very convenient when working in workshops.
  • Convenient fastening on an operator’s hand that considerably facilitates work in hard-to-reach places or at height when the operator needs free hands.
  • Extensive functionality – allows you to use the device for various tasks of thickness measurement.
  • Possibility of measurement of thin products from 0,4 mm thick.
  • The presence of an expert mode where you can see the radio signal and control two strobes for various experiments and studies.

The use of a modern ultrasonic thickness gauge UT35 will give confidence in the quality of control of manufactured products, as well as in the safe operation of especially critical objects due to the high accuracy and reliability of the results and quick setup of the device.

The ADL UT35 ultrasonic thickness gauge has a wide range of applications including laboratory, workshop and field, providing high accuracy and reliable results.

The use of the ADL UT35 thickness gauge will make it possible to obtain reliable results, perform quick adjustment of the device, and successfully solve many production problems when controlling the thickness of metal products.

ADL UT35 will allow you to determine product characteristics with high accuracy, timely identify parts with deviations from requirements, control the quality of metalworking, and the degree of wear of equipment components.

Measuring principleultrasound
Range of controlled thicknesses (for steel) with dual-combined and combined transducers0,4 – 600 mm
Details of complex shapeThe minimum radius of curvature of the product is 10 mm
Ultrasound propagation speedfrom 500 m/s to 20000 m/s
Possibility of working with sensorsCombined and separate-combined
Sensor frequency0.5 to 15 MHz
Measurement discreteness0.1; 0.01mm
Availability of 2 measuring strobesIn each measuring strobe (control zone), the signal arrival time is estimated; necessary for all modes of measuring the thickness of the probe – echo or echo-echo
Availability of a library of sound velocities for various materialsYes
Basic measurement error by ranges:
Т*=0,4…10±(0,01Т+0,03) mm
Т*=10…300±(0,01Т+0,1) mm
DisplayTFT with a matrix of 240×320 pixels
Memory sizeUp to 5000 measurements sortable by date and time
SettingsCorrection of the setting “0”, gain parameters of the path, adjustment to a specific material, automatic shutdown time (1 – 60 minutes), brightness, setting of rejection levels during analysis.
PC connectionUSB-С
Time of continuous workUp to 8 hours, low battery alarm
Power supplyLi-ion battery
Overall dimensions142×75×35 mm
Weight240 g
terms of UseTemperature: -10 to +50°C
Degree of dust and moisture protectionIP-54
This product has no accessories.
This product does not have software options.
Login to NOMO

NOMO Deals

Get the best offers in NDT products.